

How To Repair A Cracked Acoustic Guitar Ribbon
Occasionally, when the weather condition is dry and the humidity is low, your instruments may go dry and croaky. Your guitar is no exception. All the same, this problem is completely preventable and can even exist restored to the original state if you follow the instructions nosotros guide in this article. Now let follow us and encounter how to exercise DIY audio-visual guitar crack repair at home for free!
Dryness: The main culprit for cracks on an acoustic guitar
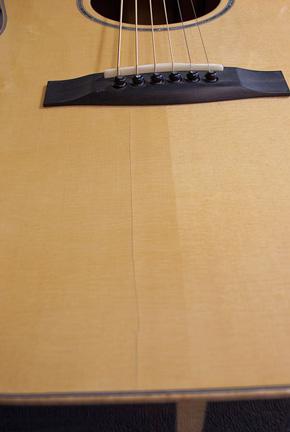
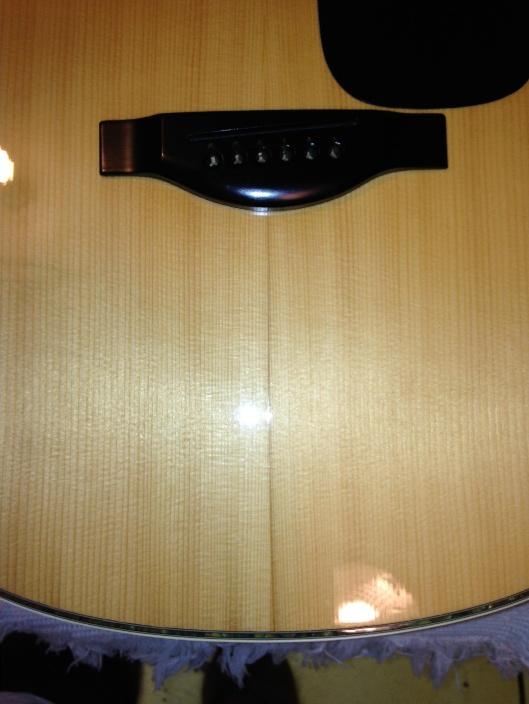
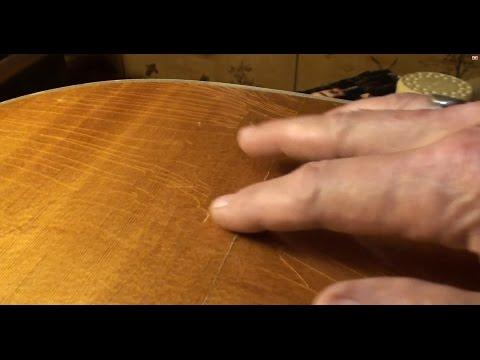
Dryness is, possibly, the almost common culprit for all the cracks which appear on your acoustic guitar. Now, the question which might arise is what are some of the kickoff signs of dryness on your acoustic guitar? Well, to be precise, in society to repair the cracks, you take to identify the most initial symptoms of the same. A washboard like appearance is, possibly, the first symptoms of dryness on your acoustic guitar.
Although dryness is the common reason for the initiation of cracks on your acoustic guitar, yet, it can be easily prevented if identified at a very early stage. Bang-up only occurs when the signs of dryness are completely ignored and no preventive measures are undertaken.
Y'all can watch this pace by step video to solve this issue:
Let us now learn how can dryness lead to such deep cracks on your acoustic guitar. Basically, the tiptop of the guitars is constructed with an arch or a radius. Then, every bit the guitar tends to dry out, this particular radius or arch starts to widen and the washboard-similar appearance of the meridian starts to get prominent.
Apart from this, if the humidity of the environment is very low and the guitar starts to dry, the arch-like structure tends to widen out and starts to larn a concave shape when the entire structure becomes extremely dry. So, if yous find that your guitar is starting to acquire a dip and concave similar structure, but, without whatsoever signs of keen, it is time for initiating the humidifying process.
There is a very common pattern for not bad of the acoustic guitars due to dryness. The instruments which are dry volition tend to crack at the tiptop terminate initially, and the instruments which are completely dried out will crack at the seam or sidelines of the equipment.
What are the about common indications of dryness on your acoustic guitar?
Following are some of the most common indications of dryness of an acoustic guitar:
- Washboard like advent on the top land of the guitar
- A faded activity due to the presence of a dropping top land
- Extremely high-pitched fret ends
- Wearing out of the pinnacle or rear radius or arch-like structure
How to DIY Audio-visual Guitar Fissure Repair at Home by yourself?
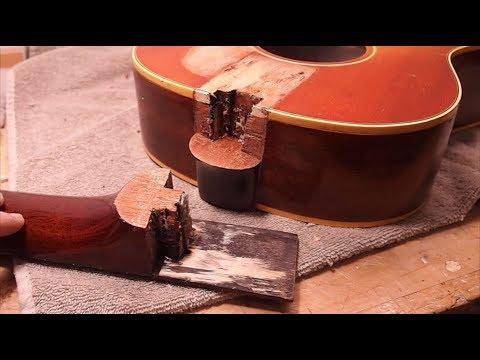
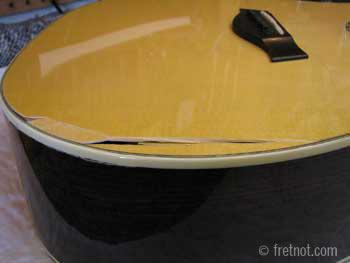
To be precise, the initial footstep in order to repair any kind of cracks on your acoustic guitar is to identify and assess the extent of the crack on your guitar. Most commonly, the problem appears due to the uneven separation of the central seam line because of excessive stress and strain. Hence, in such cases, both the housing of the guitar, which forms the acme land of the equipment tends to become loose and consequently, leave a disturbing clearance. Such kind of damages is most unremarkably plant between the bridge of the equipment and the rear stop cake.
During this stride, information technology is very important for y'all to assess whether the fissure tin exist repaired by yourself or if you need good assist. Hence, if you detect that at that place is any kind of deep great throughout the peak land of the surface of the guitar, you should never attempt any kind of DIY audio-visual guitar crack repair and should always consult an adept's advice.
Employ the correct agglutinative
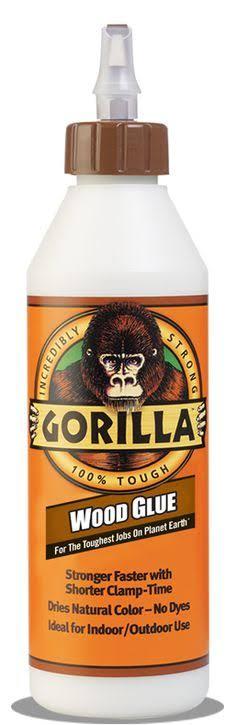
The adhesive is your all-time friend when it comes to fixing any kind of cracks on your audio-visual guitar. Nearly of the cracks on whatsoever kind of Acoustic Guitar can exist rectified with a good quality glue or an agglutinative such equally Titebond Original Wooden Gum. Withal, you should be very conscientious with the timing of the repair since information technology is very critical as the distance of the crevice will tend to get even bigger if it is neglected. Autonomously from this, any kind of accumulation of oily substances or dirt is not allowed, since it will deplete the effectiveness of the adhesive.
Similarly, yous should likewise avert any kind of tampering with your fingers on the affected area earlier carrying out any kind of repair activities. This is because information technology will lead to the accumulation of unwanted oily substances and will also limit and deplete the overall efficiency of the repair activity.
Then, how should nosotros apply the adhesive? In guild to apply the adhesive, you will need to slightly open upwardly the damaged portion. So, once you accomplish the inner vanquish, use a little force towards the outer terminate. Now, once this is done, you can easily put the glue on the inner shell of the guitar and get your acoustic guitar repaired yourself. Some of the adhesives which are really helpful while repairing acoustic guitars are epoxy glues, such as Gorilla Two Part Epoxy Adhesive and wooden adhesives, such every bit Gorilla Forest gum.
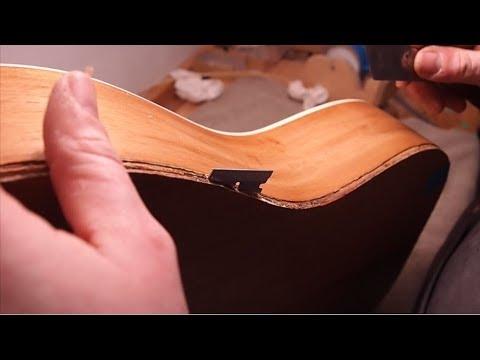
Secure the DIY acoustic guitar crevice repair properly
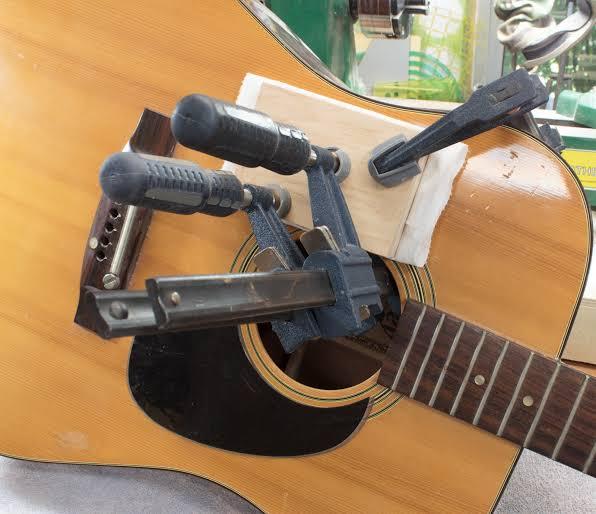
Although applying the adhesive is a very crucial step in the process of repairing your acoustic guitar, however, securing the entire repair is an every bit important activity which needs due attention. If whatever lapses occur during this process, the cracks may become even worse.
In club to secure the repair, yous will demand to use a wooden clamp with the virtually appropriate size and dimension. Clamp the surface area where y'all applied the glue in the previous stride and let it residue for some time. In this mode, the beat out of the guitar will achieve its original structure.
Apply a proper finishing touch
Applying a finishing touch is an equally important procedure during the repairing of your guitar as is applying agglutinative and securing the adhesive. This step includes stripping and refinishing the unabridged surface later on the awarding of glue and is done so as to remove any kind of visible marks or spots.
Tips to reduce the chances of cracks on your acoustic guitar
In order to stop future cracks, you must know the causes and follow a few tips to end the cracks on your acoustic guitars. Dryness and depression humidity are the worst enemies for an acoustic guitar and thus, audio-visual guitars stay the best in a humid atmosphere. Apart from this, try to handle the guitar with utmost care so every bit to utilise the to the lowest degree external stresses.

Hi music fan! I am Jeff. Hope that yous enjoy some stuff I shared hither in my personal web log.
Almost myself, Currently I am in charging as Artist Manager/Music Supervisor at 72 Music Direction. I did managed album to Grammy Award in 2022 with 7 Nominations from 2022-2020 and had the opportunities to work with : A.J. Croce, Blind Boys of Alabama, Bobby Rush, Dom Flemons, Dustbowl Revival, Sarah Grace
Governor of the Memphis Chapter of The Recording Academy is one of a honor that I am lucky to achieved.

Source: https://www.musictoob.com/diy-acoustic-guitar-crack-repair/
Posted by: matoseupis1955.blogspot.com
0 Response to "How To Repair A Cracked Acoustic Guitar Ribbon"
Post a Comment